Thursday 28 July 2016

Rain stops play .......

Happy Thursday .......

How is everyone?  It's raining here on the island .... not very nice at all.  The little man and I were going to have a trip into town but we've decided to save it for another day.

Speaking of rain ..... we got absolutely drenched on Tuesday night, going home from the Tom Jones gig.  It was lovely when we got there but oh boy did it rain later!!!

After a little bit of arguing about who had most of the umbrella, which by the way wasn't that much use it was raining that hard ....... we walked it home with hubby doing his version of Singing in the Rain!!!  Thank goodness we don't live that far from the park!
Hey I shouldn't really have complained that much ....... we'd had such a fantastic time ....... what a night! ..... what a show! ...... and my goodness, what a voice!!  Tom Jones was A-MA-ZING!!!!!!


Sorry there's not a whole load of pics .... I was too busy enjoying the show!!

The 'tent' was HUGE! .....


We got there early and listened to some of the supporting acts .... who weren't half bad might I add.
Hayley McKay was good ......


and this guy ....... AJ Brown was brilliant!  He reminded me a little of  Harry Connick Jr/Micheal Buble ...... great show.


Anyway ...... onto the crafty stuff.

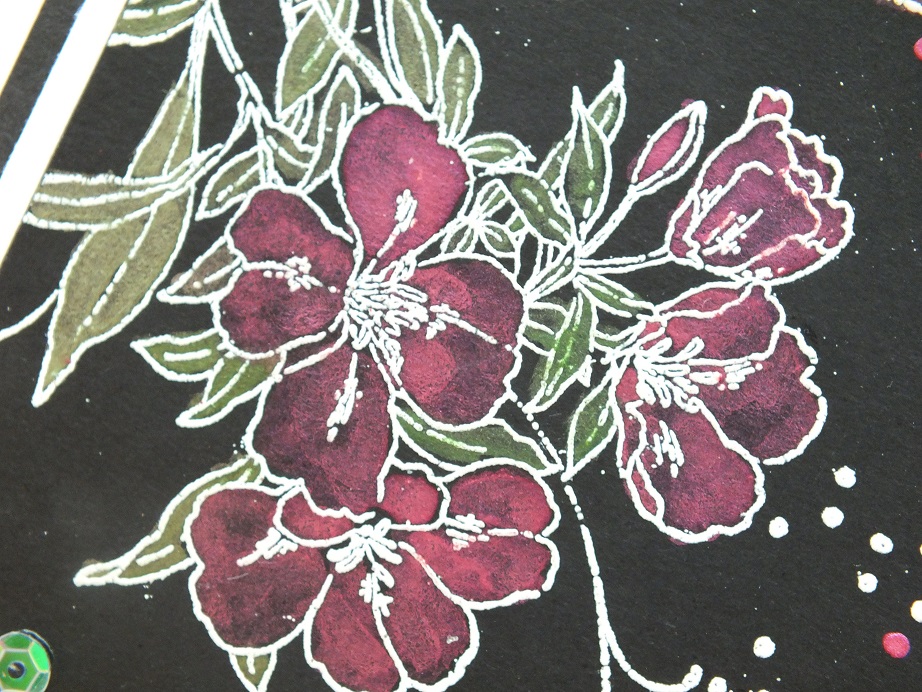
In my last post I shared with you some samples I did for the workshop last weekend.  Something I didn't show you was this .......


Brushos sprinkled through a stencil with Golden Gel Medium applied over the top.  The pigment powders start to react with the gel medium and the colour blends and spreads within the gel .....


I used three colours of Brusho ...... a red, a yellow shade and a green.
Simply tape your stencil in place over a piece of white cardstock ..... I used the stunning Black Orchid  stencil from Sweet Poppy
Sprinkle Brusho in the area you want the colour .... I gave the pots a good old shake as I wanted quite a bit of colour ..... green for the leaves, obviously ..... the red for the petals with the yellowy shade in the centres.
Spread the gel medium as you would a texture paste over the stencil design, scraping away any excess and voila!  let the pigments do the work


I then splashed a touch of Brusho in the background using a piece of acetate to apply the very watered down colour.

You don't have to use these designs just for cards ..... why not create some stunning pieces of home decor by mounting them onto canvas boards .......


I added a little bit of the stencil design to my canvas first and then painted the whole of the A4 canvas board with Black Gesso
I love the little bit of texture in the background .....


I need to start thinking about next months workshops now ....... hmmm ... not sure what we'll be doing yet.

Thanks for popping by ....... enjoy the rest of your day. I hope the weather's nicer where you are.

Cheerio until next time

Monday 25 July 2016

Let's get this week started .......

Happy Monday folks ......

Have you had a good weekend? Are you all raring to go at the start of a new week?  Not quite ...... OK neither am I .... not yet anyway!!

It's going to be a good week though ....... look where I'm going tomorrow night ......


Oh yes  ....... Tom's coming to the island ......


The HUGE marquee is all ready and waiting ...... apparently you can see it from the prom!!!

(photo taken from Facebook)
I'm out for coffee and a catch up with the girls on Friday ...... and then it's our wedding anniversary at the weekend so dinner in one of our favourite restaurants on Saturday.
Lots to do in between all that though ...... so lets get this week started.

It was workshop weekend on Saturday and as always we had so much fun.  It was Brushos this time .... seeing how they work using different mediums and different types of cardstock.
I think I'm safe in saying everyone had a great time with those little pots of magic and they were all really pleased with the results ..... 3 finished cards and loads of extra pieces to use on future projects.
I gave you a sneaky peek of some of my samples on Friday, well here they are in full .....


We did the usual with the Brusho ..... sprinkled onto watercolour card and then spritzed with lots of water to blend the colours .....  then we placed another piece of card over the top to mop up the excess giving two pieces that are similar, but not quite the same .... one to use and one to save for later

I loved the simplicity of this .... coloured background, image stamped in black ink and embossed with clear powder


A little bit of detail added using a white gel pen and a simple sentiment


This next one was made using a mop up piece of card from this finished sample .... totally inspired by the lovely Loll Thompson from Stamping with Loll ..... who by the way, does amazing things with Brushos and stencils


The background colour is what was left on the stencil I used .......... spritzed with a little more water then mopped up with a piece of white cardstock .... easy.


I then stamped and embossed the beautiful bouquet (Penny Black's Elegance in Motion) and added more colour using the same Brusho colours as the background


You can mix your Brushos with water and a little mica powder then they can be used on black cardstock too ......


Such a pretty effect ...... and another way of using those mica powders!


One of my favourites ....... I love this stamp (Stampendous Ranunculus Field)


Simply stamped onto white cardstock ....... Brusho sprinkled in the areas that I want colour, then spritzed gently to activate the crystals and watch the magic happen.


The next one was using Dina Wakley's Glazing Medium to spread out the Brusho ..... I sprinkled the Brusho onto my card (I used 2 colours ..... a blue and a green), then using a paint brush and the glazing medium I brushed over the crystals to activate the colour.


I brushed the medium in one direction and I love the effect ..... reminds me a little bit of  a woodgrain effect .......


A bit of embossing using a white powder this time ....... looks so pretty


And then back to the sprinkle and spritz technique for the background .... same 2 colours


I did a really easy Christmas design ...... using the emboss resist technique


Stamped and embossed the tree ......... one colour of Brusho sprinkled in the centre and spritzed and then a sprinkling of Chunky White embossing powder to add a bit more detail .....

And of course I never throw anything away .......... even leftover bits make great cards. 


Stamp and fussy cut beautiful butterflies .....  


Use the bits to create pretty gift tags or bookmarks even .....


The thing with Brushos is when you're just sprinkling and spritzing you never really know what results you're going to get ..... sometimes it works, sometimes it ends up not quite as you expected. Don't throw anything away ...... even the not so pretty looking pieces can be used to create something beautiful.

Phew!  That was a lot of pictures .... sorry!
The flowers by the way you can see popping into the background on the photos, were a lovely gift from one of the ladies on Saturday .... picked fresh from her garden that morning.  Thank you so much Carol .... I love sweet peas, they smell beautiful 


Thanks for popping by .... enjoy the rest of your day.
It's time I was in the craft room making a start on this weeks To do list.

Cheerio until next time

Friday 22 July 2016

School's out!! ...... for some

Happy Friday folks ......

So looking forward to the weekend ...... and it all starts right now!!!
It's going to be a busy one again though ........ we've got a BBQ bash tomorrow evening, then a day out at the Wildlife Park on Sunday, courtesy of hubby's works.  Dinner and a few drinks out this evening ........ and I've got to be ready for a workshop tomorrow.
And on top of all that it's the last day of school today ..... I'd better make the most of this weekend, I'll probably be grounded for the next six weeks on Grandma duty ..... lets hope the nice weather holds.

Yes, it's workshop time again.  I've got a lovely bunch of ladies coming round tomorrow to have some fun using Brushos ...... those fabulous little pots of magic.
I'm sure you all know what I'm talking about ...... pigment powders/crystals, that when mixed with water and other mediums, can create some amazing effects.  Similar products are Ken Oliver Color Bursts (although I don't think I can call them that anymore ..... I think they're just Bursts now!) and the brand new Infusions from PaperArtsy  .... same thing, pigment powders but with added Walnut Stain in them ...... these are gorgeous!!

We're going to be trying out different ways of using Brushos ..... making backgrounds, using them to paint with, mixing them with mica powders and gels to get a different look .... it's going to be fun.
Here's a few sneak peeks at some of the designs I've come up with as a little inspiration to get them started .....


Great for adding background colour.


Perfect for painting with ......... even on black card.


And great your Christmas cards  too ......


Well .... I suppose I'd better go and make sure everything is ready seeing as I'm out this evening.

Thanks for popping by .... enjoy the rest of your Friday and have a fantastic weekend.
The sun is making it's first appearance of the day .... you never know we may be able to dine al fresco this evening

Cheerio until next time

Thursday 21 July 2016

There's still time to enter this month's STAMPlorations CAS challenge ......

Happy Thursday .......

It's time for a little reminder about July's CAS Challenge over at STAMPlorations.  As always the theme is Anything Goes ..... clean and simple that is .... with the optional colour twist.  July's colour is nice and summery for you ..... ORANGE.  
Not a colour I use a lot but ..... it's good to try something different.


Clean(ish!) and simple and so quick and easy.  Fun too ...... and you can use any colour you like it doesn't have to be orange.  I went with it and used Ripe Persimmon Distress Stain ..... straight from the bottle .... splat the dabber top directly onto my piece of card.  the harder you do this, the more of a spat you'll get.


Love how the ink splatters ...... so much fun


A nice bold sentiment in the middle ..... from the STAMPlorations Noteworthy set ..... and job's done.


And I couldn't resist splatting the inside too ..... easy!


You can find full details of the challenge over on the STAMPlorations blog along with more inspiration and great ideas from the rest of the design team.

Happy stamping!

Thanks for popping by .... enjoy the rest of your day.
I'm up in Ballaugh today, for the monthly craft workshop.  I believe it's going to be a messy one .... so aprons at the ready.

Cheerio until next time .......

Wednesday 20 July 2016

It's getting hotter .......

Happy Wednesday folks ......

Well the thunder storms last night haven't cooled the temperatures down any,  I don't know what it's like where you are but ...... its HOT! HOT! HOT! here.  And the sun is shining again!
Seeing as all the housework is done, the washing is out and the place is tidy ........ well, the old craft room looks like it's been hit by a tornado but I'll sort that later ...... it's too flippin hot!!  Even the fans are blowing warm air.  So ...... I think its time to grab the sun lotion,  my book and a nice cool drink and head off up to the terrace .... lunch in the sun!

Before I go though here's a few of my Sweet Poppy Stencil samples .... did you see Lucy on the TV yesterday? Lots of lovely Christmas ideas.

'Tis the Season ...... love this stencil.


Use it as is ...... it's perfect for quick and easy Christmas cards.
 
Use just the words as your greeting on a card ......


I used an embossing folder for the snowflakes and then added the words using the stencil with the Sweet Poppy Stencil Medium and then sprinkled over with the fine glitters


Break up the sentiment and use it in different ways ......


Again I've used the paste through the stencil and then added glitter over the top ......easy!


And that bunch of mistletoe is just so pretty .....


It even looks great on it's own, for a really CAS design ......


A nice festive greeting stamped on the bottom, and a pretty satin bow and you're done


Put it on the inside too .... why not


A couple more favourites were the snow globes .... how cute are these!


Perfect for decorating MDF baubles.
Simply paint the baubles whatever colours you like .... I went for the icy blue look.  Then use the stencil and the paste to add the decoration


Lots of sparkly Crystalina glitter over the top  ......


And a festive greeting to finish off.
These could even be used as tags for those special Christmas gifts ......


And of course the snow globes make fab cards too .....


OK ....... enough about Christmas and snowy scenes.  Time to enjoy that sunshine ........ BBQ for tea I think.

Thanks for popping by .... enjoy the rest of your day. Hope the sun is shining for you too.

Cheerio until next time