Sunday 29 May 2016

Mixed Media ...... the less is more approach

Happy Sunday .......

Happy Bank Holiday weekend too ...... and isn't it a nice one!  Sorry I've been AWOL for the last week or so ...... not really sure where the time went but hey! life gets in the way sometimes.
Everything's good though ... the old craft room door is open, projects are .... underway shall we say. Although I think Mr Mojo has had a little too much sun .... he's just not playing ball!!

This years Isle of Man TT is underway ....... practice week started yesterday.  Lets hope this beautiful weather lasts for the whole two weeks.
It's going to be a busy fortnight .... both of the kids are working all hours for most of it ...... goes without saying, the hospitality industry on the island gets a little hectic this time of year!
Not sure Lauren is looking forward it all, and Chris showed me the rota he's done for his place ....... he was down as working everyday for the whole fortnight (well he is the landlord) ..... as AFD ????   I won't tell you what it stands for ..... you can probably guess.   And if you're in the hospitality business you'll probably know what it means!!!!!  Let's just say he'll be ready for his holiday at the end of it ...... we all will!!

Anyway ..... enough about the TT.  My long weekend got off to a great start ...... a lovely workshop yesterday with a great bunch of ladies.
I introduced them to a little bit of Mixed Media ...... out of the comfort zone for a couple of them I think, which ..... is not a bad thing.  By the end of the afternoon they had all created beautiful pieces of art work that they were really proud of .... well done ladies!!

Here's a few samples I'd done to give them a bit of inspiration and maybe a starting point ...... mixed media but with a little bit of a less is more approach

We started with a card ..... to get them used to using different products, and layering to give texture


They each worked on a small panel of card .... adding colour first using Distress Inks, a little water, and a piece of acetate to apply the colour.  I'm loving this technique at the moment, it's such an easy way to get a nice watercoloured background


Next we added a bit more interest to the background using texture stamps ...... the ones I used here are from Stampin Up ....... Gorgeous Grunge and Timeless Textures ..... they also turned out to be favourites among the ladies on the class.

Next came the main images .... stamped directly onto the inked card to get the placing of them and then stamped also onto a separate piece of card, which they were then coloured and fussy cut


Both the beautiful poppies and the butterfly I used are from Inkylicious.
Before adding the coloured images, I applied some texture paste through a stencil, randomly onto my design to add in a touch of texture ......


Whilst the paste was wet, I sprinkled on some embossing powder ..... a mixture of white and gold detail powders ,,,,,,,, and then I used a heat tool as normal.  This is so cool .... when the EP melts and the paste gets hot it starts to bubble adding even more texture ..... you have to be careful though not to over heat it as it will burn .... how do I knows that ..... hmmm!!!
And I had to add a little something on the inside too ......


Another example I showed them was a card I made for a Blog Challenge earlier this year .......
same sort of thing ..... mixed media but very CAS.  Inks, stamps, texture paste .... only this time I used gilding flakes to add a bit more interest.  You can find more details on this one here if you'd like to take a look


Then we moved on to a canvas .......... a favourite look of mine ...... small canvas board mounted onto a larger one (in true Barbara Gray style)


They used all the same techniques only this time onto a 7x5 inch canvas board


Started with the colour ..... added the texture stamps, and the main images.  Added in some texture paste  ........


Overlaid the coloured images, and finished with a touch of gilding flakes here and there.


For the larger canvas we added some texture paste first and then painted over the whole thing in either black, as I've done here ..... or a colour to compliment the centre piece


As you can see I finished off mine by adding a bit of white paint dry brushed over the texture paste to bring out some of the detail.

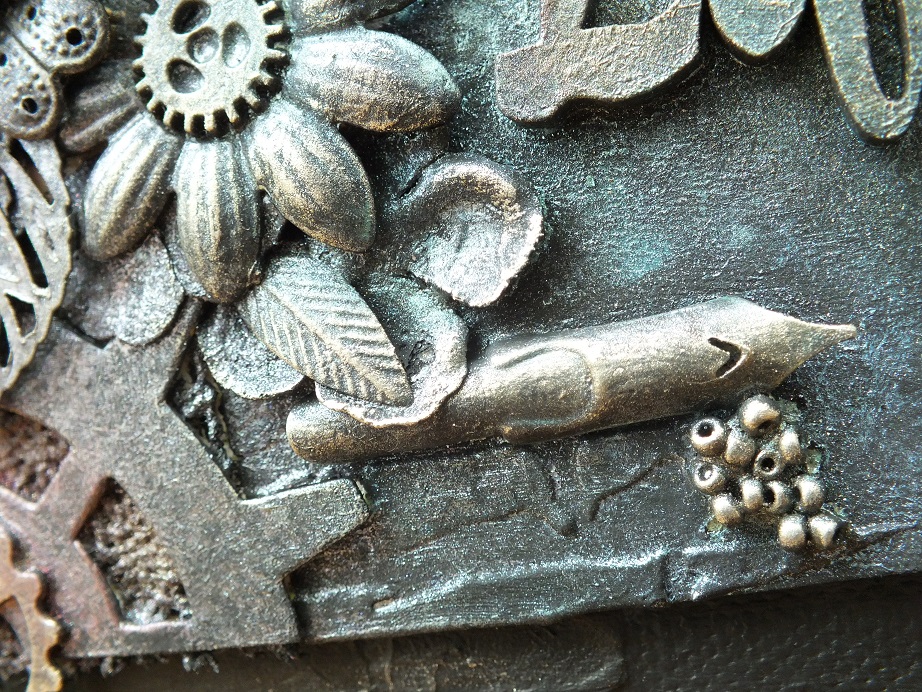
Another design I showed them was a little something I did just for me ....... another canvas, this time one of the boxed style .....


Exactly the same techniques as before, same stamps, just different colours


I used a honeycomb stencil this time with the texture paste ......


Added plain white embossing powder over the top and heated it ....... look at how it raises up more ...... I love it!


Once it had cooled down, I applied a touch of Flitter Glu over parts of the raised areas and added some gold gilding flakes, then finished off the whole thing by adding some words.


The whole afternoon was fun and I think I'm safe in saying that they're not scared of mixed media anymore.  It doesn't have to be all dark and grungy, with lots of paints and pastes and metal everywhere .... you can do as much or as little as you like.

I always love the end of the afternoon .... not because I've talked and laughed too much, haven't sat down for nearly 4 hours, eaten far too much cake and biscuits and the class is over but ...... because it's nice to see how everyone took the same information, saw the same samples, used the same products but came up with completely different results and they're happy with what they've created. Look at this fabulous display ....... well done ladies, you deserved those glasses of wine!


Thanks for popping by ..... enjoy the rest of your day and have a great Bank Holiday!

Cheerio until next time ......
xx

Thursday 19 May 2016

A little reminder for the STAMPlorations CAS card challenge ......

Happy Thursday ......

It's time for a quick reminder about this months CAS Card challenge over at STAMPlorations.  As always Anything Goes ..... CAS (Clean and Simple) that is, with the Optional Colour Twist of Magenta for the month of May .......


You don't have to use the colour twist .... you don't have to use STAMPlorations products, but it would be fabulous if you did!

I've gone for both .......


I've used the STAMPlorations stamp set City Girl from the Bees Knees collection
I simply stamped the lady onto a piece of white card, uisng black Versafine ink.  I added colour to her coat using the Adirondak ink Soft Plum, and then I fussy cut around her.


I added a touch of black to her hair, and the belt on her jacket and then gave the belt and her sunglasses a thin coat of Glossy Accents to give a touch of shine.

For the background I used the acetate technique for smooshing the ink onto my card ...... I applied some ink onto a craft sheet, spritz with water then used a piece of acetate to pick up some of the ink. I then dabbed the acetate onto a piece of white card applying the ink randomly to create my background.


Once this was dry I used another of the stamps from the City Girl set to add some extra detail to the background, and embossed with a white detail embossing powder


I then attached the lady onto my card using foam pads to add dimension .....


and finished everything off with a sentiment, again from the same stamp set


More smooshing and another fab stamp from the City Girl set inside


Have you entered the challenge yet ..... there's still plenty of time.  Pop over to the STAMPlorations CAS challenge blog for more inspiration from the Design Team and full details on how to enter .... Happy stamping!

Thanks for popping by .... enjoy the rest of your day.

Cheerio until next time


Wednesday 18 May 2016

Finishing touches .......

Happy Wednesday ......

Another week is flying by.
Things are starting to get busy over here with preparations for this years Isle of Man TT ..... only 10 days to go before it all gets underway with the start of Practice Week .... whoo hoo!! And when it all comes to a close we're off to the Cotswolds again for our little family week away .... can't wait!

Things are busy in the old craft room too ...... DT stuff to do, workshop to prep, an SU party to organise at mine ready for when the new catalogue launches, and a few bits and bobs to do just for me ..... because I can!!

I've just finished off adding the final touches to my project from one of the workshops I went on whilst I was across in the UK.  Here's what we got up to with the lovely Maria Simms ...... based on a workshop done by a talented lady named Debbie Rock (I think all the workshops have been done now so I'm safe in showing this  ....... I hope I am anyway!)


We had great fun getting all inky and covered in paint, creating the centre panel on the actual day of the workshop.  And then I've since mounted mine onto the larger canvas, and added more background detail with a stencil and some texture paste.

There's a bit of everything on here ..... stenciling (my favourite Brick Wall), texture paste (love it!!), paint, mica sprays, and lots of embellishments.


There's lace, paper flowers, lots of metal trinkets.  Die cuts, beads and I even added an old piece of chain on there


Everything was held in place with gel medium and dried off with the help of a heat tool.  The gel medium lets you create layers with the embellishments giving lots of depth and texture to your projects


Once we were happy with the layout everything was painted over in either black or white (as you've probably guessed .....I went with black)
Next came the fun part .... lots of spray inks and mica sprays to give the colour and sheen to the finished panel. More mica was brushed over in parts to give more depth of colour


And then I finished everything off with a touch of Treasure Gold Gilding Wax, just here and there to give more shine


Not sure the colours come across well in the photos ...... they're much more intense in real life.
I used a pink shade and touch of purple down the left hand side blending into turquoise and blue shades with just a touch of green on the right.  Then to highlight in places, I spritzed over with Perfect Pearls in the Heirloom Gold shade and finished with White Fire Treasure Gold.  Really pleased with how this turned out ....... very Finnabair-esque I think.


I wanted to mount it onto something bigger so, I used the brick wall stencil again onto a 12x12 canvas board to add some background detail and texture.  Painted the whole thing black and then added just a smidge of the White Fire Treasure Gold here and there, to bring out some of the detail of the brick wall


Thanks to Maria for another fabulous workshop and thanks to Debbie Rock for the inspiration.

Thanks for popping by .... enjoy the rest of your day.
I've got to tidy the old craft room .... again!!! and then a little bit of reading to do later.
A friend and I popped to the book/art shop over in Port Erin yesterday, and along with stocking up on some watercolour card, a new canvas and some new paintbrushes, I found this on the shelf ...... (I only went in for a look!!!)


I do like a nice G&T as you all know ....... and I'm gathering quite the collection now


 so I thought I'd try and learn a little more about Mother's Ruin


Cheerio until next time ......


Monday 16 May 2016

Happy BIG Birthday Sandie .......

Happy Monday!

I hope you all had a good weekend.
There's a little celebration going on today ..... the lovely Sandie (London Days) is having a special birthday ..... she's 50! ...... whoo hoo!!! (Hope she doens't mind me telling you that)


Happy Birthday to You
Happy Birthday dear Sandie ....
Happy BIG Birthday to YOU! 

To mark the occasion Kylie (Kylie is Addicted to Stamps) from Happy Little Stampers, is hosting a surprise birthday linky party


 and I'm joining in the fun


I used the Happy Little Stampers Doodled Flowers ...... Big Bold Numbers (the perfect set of stamps for those special birthdays) and Fun Birthday Sentiments, along with the flower stem from one of the new set of stamps from PaperArtsy ...... EKC01, designed by the lovely Kay Carley

I simple stamped the stem onto a piece of white card, added the pretty flowers and then coloured them using Distress Inks


I stamped the numbers onto a separate piece of card, fussy cut them, and then added the white dots using a gel pen before attaching them to the front of my card


To finish off I stamped the birthday greeting and added a few inks splatters here and there, mixed in with some tiny dot of glitter glue


Inside there's more of those pretty blooms ....


and just a few more inks splatters too


Kylie's keeping the linky open for the next two weeks so why not join in the fun and wish Sandie a very Happy Birthday!

You may have noticed I have a new watermark on my main picture ........ designed by my lovely blog buddy Loll Thompson (Stamping with Loll) ..... is there no end to this lady's talents!!!
Get to the bottom of this post and you'll find I have a new signature too ..... thank you so much Loll I love them.

Thanks for popping by .... enjoy the rest of your day.

Cheerio until next time ....


Friday 13 May 2016

loves me ...... loves me not

Happy Friday 13th! ........

You're not superstitious are you?  I hope you're not having one of those days when you wished you'd stayed in bed.  Fingers crossed things are going OK so far ...... but it's still early yet!

It's time to give you a little bit of inspiration for this month's Craft Stamper Take It Make It Challenge.  It's an easy one this month .....  just Take a Stamp.  Anything goes as long as there's rubber stamping on your project somewhere ..... simple!

I wasn't sure I'd have time to join in the fun this week, what with being away and all that ..... but I managed it.  Couldn't resist playing with some of that new stash I brought home with me.


I love these stamps from IndigoBlu ..... they're the Colour Me range, and this one is the Daisy .... it's just gorgeous, and so easy to use.

I've simply stamped the image onto a square piece of white cardstock with a black Versafine ink and then heat embossed it using a clear powder ....... look at all that detail!


I then coloured it using Distress inks (picked raspberry for the petals and a mix of mustard seed and wild honey for the centre


I added the words around all 4 sides of the daisy ...... from the JOFY13 stamp set .....


And finished off with a little something on the inside ....


I think you'll agree .... a really pretty design, quick to achieve and suitable for all kinds of occasions.

The challenge is sponsored this month by ...... Designs by Georgina

and here's the fabulous prize up for grabs ....... 3  gorgeous stamps sets and three brand new stencil designs


Get those entries in  .... you never know Friday the 13th could be your lucky day.  And if you're looking for more inspiration then pop over to the Craft Stamper Blog today .... the DT have been busy again.
Happy stamping!

Thanks for popping by ..... enjoy the rest of your day and have a great weekend.  Lets hope the sun shines.

Cheerio until next time

Linda
xx