Friday 29 April 2016

Re-united at last!

Happy Friday to you ......

And a happy Bank Holiday weekend.
Well I'm back across in the UK, at the start of a week and a bit long craft bonanza, and me and my laptop are together again .... yeah!!!
Not sure I'm liking the weather over here though ..... it's SNOWING!!!! What's all that about .... it's May on Sunday.

At least we won't be out in the cold ..... we're off to a Craft Retreat later this afternoon.  Starting off with afternoon tea and a nice old get together ...... followed by a weekend full of getting inky and messy .... can't wait.

Did you see Lucy from Sweet Poppy Stencils on the TV this morning?  I must confess I've recorded the shows but I'll have to wait until I get back home before I watch them.  I'm sure she was fabulous as always.

I gave you some sneak peeks the other day of a few of the stencils that would be on the show .... now here's a couple of them in more detail ......

Beautiful Blossoms ..... I love this design


A really simple card ..... Glossy Black paste through the stencil, onto a simple weathered wood background from my stash (another really easy, but very effective technique using PVA glue and Distress inks ...... more details some other time)


Whilst the paste was still wet I sprinkled over some fine crystal glitter in the Periwinkle shade .... so pretty!

To finish off I added a sentiment banner ......


and a pretty butterfly to one of the blooms


Next up ...... same stencil .... different look


Using the Glossy Black paste again, this time over a Brusho background ....


Add some nice words .....


and finish with some white enamel accents to the centers


Look at all that fab detail in the stencil ..... just gorgeous!
 
Oh well, I'm going to have to dash.  Final check on suitcase and craft bag and then we're off!

Thanks for popping by by ...... enjoy the rest of your day and have a fabulous weekend.  Make the most of the Bank Holiday break.

Cheerio until next time

Linda
xx

Tuesday 26 April 2016

Sweet Poppy Stencils sneaky peek ......

Happy Tuesday folks .......

Just a quick post to let all you Sweet Poppy Stencil fans know that the lovely Lucy is back on our TV screens again later this week with some gorgeous, brand new stencil designs, some back in stock from the last show (yes the elephants are back!) and some old favourites.
Make a note ..... 10am Create & Craft (Sky channel 674, Freeview 23, Freesat 813 and Virgin channel 748) and ...... the show will be coming live from the Belfast Crafting Live Show

Here's a few sneaky peeks at some of the samples I sent to Lucy for the show ......
A pretty floral design .... one of my favourites ......


Something brand new ..... any guesses?


Another stunning new design .... love this!!!


Tune in to see these new designs and more, see some fabulous techniques and get lots of tips on how to get the best from your Sweet Poppy Stencils.

This is actually a scheduled post .... we're heading back to the island today, hopefully! The weather forecast wasn't that brilliant ....... rain and strong winds which is not good when you're on the Manannan so fingers crossed the crossing wasn't too bad. I'm not good when it gets bumpy!!

Anyhow ....... I've decided to leave my laptop in the UK  (how am I going to manage without it!)  
Well, it's not going to be for long ..... I'm back over there on Thursday afternoon - I said it was a busy week!!!   And ....... as I'm flying across this time (hope the weather calms down) and CityWing have only gone and changed their luggage allowances (thanks for that!!) I wouldn't have been able to take it with me.  So, rather than bring it home, rush to get everything done and scheduled etc., and then be without it for OVER A WEEK ...... I thought it best to leave it over there and get it home later.  Don't worry I have a plan!
I'm probably feeling like I've lost an arm without it but ..... at least I can check email, and Facebook etc., on my phone, or there's always the Mac!!  Or, if hubby is feeling really generous he may just let me use his computer ......then again!

Thanks for popping by ..... enjoy the rest of your day and I'll be back with you (hopefully) later in the week.

Cheerio until next time.

Linda
xx 

Monday 25 April 2016

A bit of a flying visit .......

Happy Monday folks,

Hope you had a good weekend.
It's the start of a brand new week and boy it's going to be a busy one ....... projects to finish, blog posts to write and schedule, cases to pack (again!) ..... I'll be ready for the break at the weekend!

Hubby and I are currently across in the UK for a couple of days ..... been here since yesterday, visiting family. We're back in the Isle of Man tomorrow afternoon ......... then the chaos starts!
Before all that though I want to share with you the projects from Saturday's workshop ........ seven lovely ladies having fun with some simple masking techniques, creating pretty card designs with the look of layers and depth.  It's amazing what you can do with a post-it note!!

OK ..... here we go.  You may want to grab a cuppa ....... there's quite a few pictures but I'll try to keep things brief.
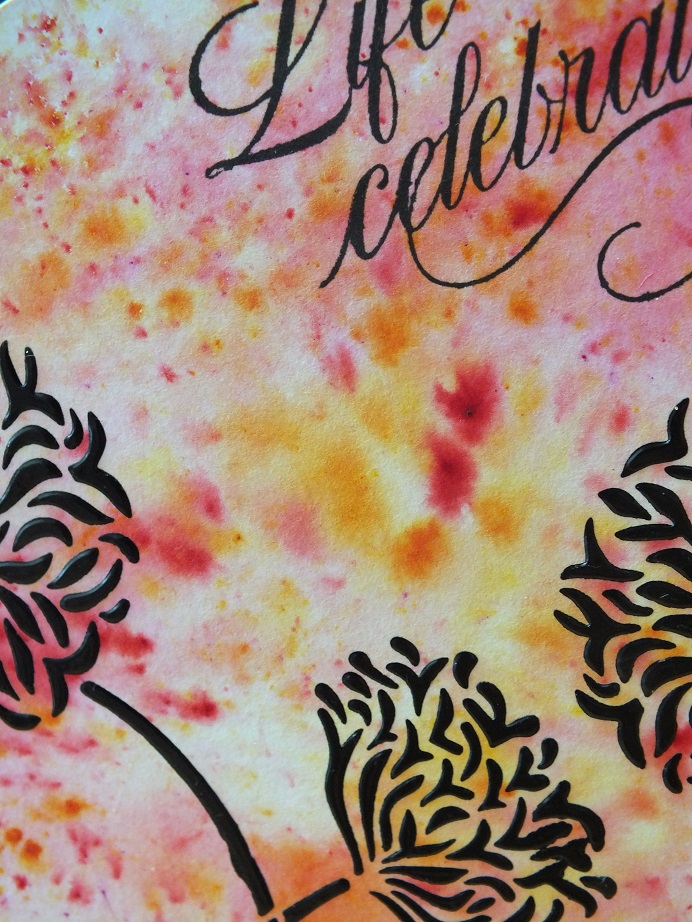
First up ..... a simple design using a nice floral image


I chose a pretty daisy for my all-over design.
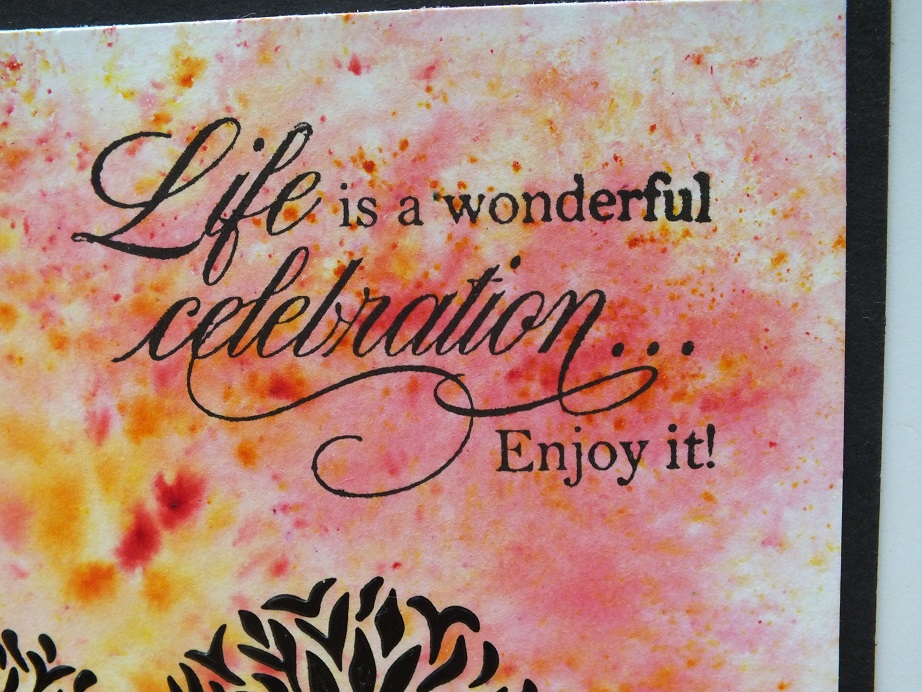
I made the mask for the sentiment panel and put it in place.  I chose the words first, stamped them onto a post-it note then cut around them.
Next .... the masks for the daisies.  Again stamped onto a post-it, and then cut around it

Quick tip ...... make more than one mask, you're going to need them.  The easiest way is to stamp the image onto the pad of post-its, making sure to get as much of the image as possible onto the sticky edge, then cut through multiple layers (I actually cut 3, but you can do more)

Start by stamping the flower onto the card, making sure that some of the petals are over the mask for the sentiment panel


Mask the stamped flower and stamp your next image.  Mask and stamp, mask and stamp, moving your masks as necessary each time, until the whole of the card is full.

Remove all of the daisy masks and start to add colour.  I used Distress Inks and a little water .... picked raspberry, mustard seed and spiced marmalade


Once all the flowers are painted, remove the final mask (the sentiment panel) and add the words


To finish off draw around the edge of the panel using a fine liner pen ..... use a ruler if you prefer this straight or do as I've done, use the ruler as a guide but add in a little squiggle here and there so that it looks like it isn't supposed to be straight.
I also added a little something on the inside ......


Next up ..... a one layer card.  Not always the easiest style of card to create, no room for mistakes but always a favourite of mine


And this time we carried the design onto the back of the card too


Again masks were made using post-it notes to cover the butterfly (Inkylicious)


Stamp the butterfly onto the card and mask, and then continue across card front, and back, masking each time. Turn the butterfly slightly each time to create the look of movement.

I decided to just add colour to a couple of the butterflies leaving the rest without colour ....


A simple sentiment  added to the front ......  and another one on the inside finishes the card


Last but not least ....... my favourite!  A more vintage look I think .......


Looks a bit tricky but trust me it's not!

Make a mask for the sentiment ...... and decide where you want it to go.   Mark the corners with a pencil and remove the mask.  Stamp the butterflies (Inkylicious) over two of the corners and then mask both of them


Put the sentiment mask back in place, over the masked butterflies and stamp the flowers across the corners


Remove the butterfly masks and add your colour to the flowers and the butterflies (picked raspberry and mowed lawn)

Using a piece of acetate apply some of the distress ink to the background, to give that pretty water coloured look

I love this technique it's so simple to do.  Take a piece of acetate, smoosh some distress ink onto it and spritz with a little water .... the more water, the paler the colour will be.  Gently dab the acetate onto your card to apply the colour, adding more ink or more water to get the desired effect


Remove the sentiment mask, join up the corners using a black fine liner pen as before (adding the squiggle here and there) and stamp the words (Inkylicious) in the center


I love the look of layers, when actually it's all done in just one

For the final finishing touch I added a few sequins and dots of glitter glue to catch the light and add some sparkle


And of course I had to add the design to the inside too .....


I used the acetate again to apply the colour to the centre .....


and stamped those pretty blooms (from a retired stamp set from Stampin Up!) in the corners ......


All the sentiments are from Penny Black unless stated otherwise.

Thanks for popping by .... enjoy the rest of your day.
I'm off to do a spot of retail therapy, call and see a friend and then it's dinner out this evening with my big brother and sister-in-law

Cheerio until next time

Linda
xx

Thursday 21 April 2016

A little birdie told me .......

Happy Thursday folks .......

Oooh ..... it's nearly the weekend and boy am I ready for it this week. I can't believe it's been over a week since my last blog post .......there's been a lot going on!!

Today's post is a little reminder of this months STAMPlorations CAS card challenge


As always .... the challenge is Anything Goes, as long as it's clean and simple, with the optional colours twist this month of .....  SPRING GREENS

I'm finding myself reaching for green more and more lately ..... I'm loving the Distress shades Twisted Citron and Mowed Lawn especially with a touch of Salty Ocean in there ..... so pretty!


Just look at these two .... how cute are these little guys!
They're from the Bee's Knees stamp range from STAMPlorations ..... called  Small Birds

I simply stamped the branch (an oldie but goodie from my stash) using a green and a brown ink, onto a piece of white card.  I then stamped the birds onto the branch and coloured them using  Distress Inks, mixed with a little water.
I always find when I'm colouring with Distress it's easier to paint the image first with a little bit of clean water, then add the colour.  The ink spreads easily and blends really well.  I start with a tiny bit of colour and build it up gradually.  It's always easier to add colour than it is to take it away!


To add a bit more interest to the background I used the ARTplorations stencil ..... Dots All Over and one of the green shades of Distress ....


And then finished off with one of my favourite little sentiments from my stash (another stamp that's been in there forever ..... no idea where it's from, it has no packaging!!)


As always, I've added a little something on the inside ......


That fabulous stencil again, and just the end of the branch to frame the greeting.


Now it's over to you.  Don't forget there's prizes up for grabs ...... you can find all the details on the STAMPlorations Blog along with lots more gorgeous inspiration pieces from the rest of the Design Team ..... trust me, you won't be disappointed!  Happy Stamping!

I'm hoping this qualifies for this weeks Less is More challenge.  It's a Theme week and we have to use 3 stamps
Hmmm ..... thinking about it now I suppose it could be classed as 4 ..... I'm not including the sentiment.  Fingers crossed it's OK.   I missed playing along last week and it was One Layer Week too ...... I was gutted!!

So .... what's been going on for the last week .... well, we did get a new car.  Not brand new I hasten to add, but new to us.  Meet the latest addition ...... it's BIG!!!  Not sure I'll be driving it any time soon but, we'll see.


Have you noticed it's got a tow bar ..... you know what's going to come next don't you.  The other half is already talking about hiring caravans and stuff!!!  Thank goodness caravans are not allowed on the Isle of Man ...... except when the racing is on ..... that's the TT, the Southern 100 or the Grand Prix ..... and only then with an actual permit.  Maybe I don't have anything to worry about after all!!
We're actually taking her (I think it's a her) on a trip across the water on Sunday.  Yes we're braving the ferry and going across to the UK  for a couple of days ..... family stuff.   Fingers crossed the weather's good.  I don't like it when it get's bumpy ..... especially on the Manannan!!

I've got a lot to do before then though .... including a workshop on Saturday.  And .... I've got to get on top of all my DT stuff, including blog posts, for next month because I'm away again at the end of next week ..... yeah!!!   I've got a  two day craft retreat ......  a week with my bestest crafty buddy across and my first craft show of the year ..... I know!!! it's nearly May and I haven't been off the island yet.  I can't wait!!

Thanks for popping by ..... enjoy the rest of your day.
I'm actually AWOL from the old craft room when this post goes live (don't tell anyone!) ...... I'm having a crafty afternoon with the ladies in Ballaugh ....... well, all work and no play is just no fun at all!

Cheerio until next time

Linda
xx

Back again (Happy Friday by the way!!)  Thanks to the nudge from my good friend Loll I'm also linking this up to this months CAS Mix Up Challenge 


The birds and branch have been stamped, there's a little but of stenciling on there and I've used water colouring as my choice element.

See you again soon .... I promise! xx

Wednesday 13 April 2016

The ARTplorations Stencil Blog Hop

Happy Wednesday .....

And welcome to the  ARTplorations Stencil Blog Hop  with the STAMPlorations girls


Today we're showcasing some of the fabulous stencils available from STAMPlorations and giving you some ideas on how to use them.

You can join in the fun too ......  there's prizes up for grabs!
All you need to do is leave a comment here on my blog, and also on the rest of the Design Team blogs to be in with a chance of winning.
Full details of the prizes can be found over on the STAMPlorations Blog

So .... what have I got for you ........ the gorgeous HAPPY FLOWERS stencil ..... I love this!!
This stencil is available in two sizes, the big one is great for using on a canvas or a larger project and the small one .... which is what I've used here ...... is perfect for your cards


I simply rubbed over the back of the stencil using my Distress Ink pads to apply the colour (Twisted Citron and Mermaid Lagoon).  I then spritzed with a little water and  pressed the stencil onto a piece of white card ..... simple!
I love the way the ink spreads and gives this nice mottled effect .... it's a really simple and effective way of using stencils, and no two prints will be exactly the same


Using a paper towel mop up any excess water/ink from the print and leave to dry.

A nice sentiment on the bottom (from the Blooming Buds stamp set) ......


and I finished everything off with a strip of white card, coloured using the same Distress colours, across the bottom of the stencil print ..... hides any uneven edges!

I added a little something to the inside too ....


A bit of smooshing with the same shades of Distress ink .....


Check out what the rest of the Design Team have made.  You'll find links to all our projects here.

Don't forget to leave those comments if you want to be in with a chance of winning one of the prizes.
Commenting closes on the 17th April and the winners will be announced on the STAMPlorations Blog on 19th April.

Happy hopping!

Thanks for popping by ..... enjoy the rest of your day.

Cheerio until next time

                                 Linda
                                    xx