Tuesday 28 February 2012

Don't Scrap it!

Hello everyone,
It's a lovely day over here in the Isle of Man, it's like spring has arrived. Hope it's as nice where you are.
First, I'd like to say a big Thank You  to everyone who left comments on my Blog challenge post last week.  It was the first one I'd entered, and I was thrilled to get so much positive feedback - Thanks again.

Here's my entry for this weeks challenge over at Less is More  http://simplylessismoore.blogspot.com/   It's Week 56 and the subject is 'Don't Scrap It'. It's all about using up some of those precious pieces of card and paper, or ribbon and lace that we just can't bring ourselves to throw away, no matter how small they are.
Wk 56   Don't scrap It
The balloons were cut using the 'Alphalicious' Cricut cartridge from scraps of  BoBunny's Double Dot papers.  I love these, and I must admit I keep every piece, even the tiniest ones. You never know when they'll come in handy. 
I attached the balloons with foam pads, and then the strings were hand drawn.  I made a small hole either side of the balloon strings and knotted a scrap of matching ribbon through, stamped a sentiment with co-ordinating inks and there you have it, quick and simple.  It made me smile when I'd finished it!

Hope you like this weeks entry.

Pop by again soon.

Linda
x

Monday 27 February 2012

1 week to go, to the BIG 50!!!

Happy Monday everyone,
That's right, just 7 days to go before that BIG birthday of mine.  Not looking forward to that at all!!  I'll no longer be able to say I'm '40 something', it's scary.  At least the postman cheered me up this morning - both of them.  They brought me parcels that were full of crafting goodies - yeah!!
today's delivery

I got my long awaited Tim Holtz Distress Markers - full set, one of his brand new dies, Word Play (can't wait to use that), some new journals to do a couple of projects I have in mind (that's for another blog post) and some gorgeous new Lily of the Valley Stamps - guess what I'll be doing this week....
He also brough me my first birthday card, well I think that's what it is, I'm not opening it until next week. 
 
I know who it's from because there are only a couple of people who use that nickname for me, my friend Trudie, and Nick and Julie Goddard, good friends of ours from down in Stevenage, Herts. (They also put their name on the back of the envelope!!!) It's a bit of a long story where the "Lady" bit comes from, and it was a very long time ago.  Always brings back memories though.  That's maybe a story for another time.
Well, must be off. Sorry it's a bit short and sweet but I need to find a home for all my new goodies.  Have a great day everyone and I'll be back again soon.

Linda
x

Thursday 23 February 2012

My first Blog challenge!

Hi there,
Well, here it is, my first Blog challenge entry.
I'm entering it in this weeks challenge, over on Less is More -  Week 55 'Punches and Die cuts'. LIM Blog Challenge What do you think?
clean and simple

I do like clean and simple cards, they're quick to make too.  Ideal if you need to do a lot of cards all the same design.
Here's a list of what I used...
6x6 white card blank
Hero Arts Long Branch stamp
Hero Arts sentiment from a clear mini set
VersaMagic inks in Gingerbread and Hint of Pesto
Black VersaFine ink
Stampin Up Bird Builder punch
Brown Bazzill cardstock
EK Success small flower punch
Pink scrapbook paper

I do hope you like it.

I'm off now to try and upload my entry.  Wish me luck!!

Linda
x

Wednesday 22 February 2012

Less is More

Good evening everyone,
This is weird, I don't normally blog at this time.  I hope you've all had a good day. It's been very wet and windy on the Isle of Man today, not nice at all.

I'm going to enter a Blog challenge! So what, I here you all say, but I've never done one before so it's all a bit new to me. I'm quite excited (it doesn't take much!)
Since I've been blogging, I've noticed that there's quite a lot of 'Blog Challenges' out there. So, after a little bit of research/investigation and a couple of enquiries, I found out a bit more about them, and I think they could be fun.
What started me off was, I got a link to view SU demonstrator Sally-Jo's blog.http://stampin-sally.blogspot.com/  Take a look, there's some fantastic stuff on there.  She's been busy updating it with what she's been upto lately and posting all the beautiful projects she's been working on. I love looking at her designs, she's one clever lady.  From there, I usually follow a link and check out Sally's SU mum's (Julie's) blog  http://juliesjapes.blogspot.com/   Again, this is a lovely place to go for inspiration and ideas.  On there Julie also has a list of blogs from other members of her SU team and this morning I noticed that a couple of them were entering a Blog Challenge for  'Less is More' http://simplylessismoore.blogspot.com/
This is a Challenge blog, created by two crafters called Mandi and Chrissie, to showcase 'clean and simple' cards, hence the name 'Less is More'. (Chrissie was very helpful and answered my questions this afternoon)  They set a different challenge every week.  This week is a Theme of 'Punches or Die Cuts'. So I thought I'd give it a go.  I'll be back tomorrow to show you what I come up with.  In the meantime, here's a couple of what I would call 'less is more' cards that I did a while ago.

all done in one colour of ink
This set was done for a friend of mine who sells cards to raise money for her local church.  I got the idea from an article in an issue of my favourite craft magazine, Craft Stamper.  It was all about Stamping with Butterflies (Sept 2011).  The picture isn't that clear, but I used the SU stamp set 'Strength & Hope' which is one of my favourites. The butterfly is just beautiful. 

Well, I'd better go and get my thinking cap on.  Pop by tomorrow and hopefully I'll have my Challenge entry to show you.
Bye for now
Linda
x

Saturday 18 February 2012

Lunch, a show, and a covering of snow!

Hello everyone,
Hope you are all well.  It's been a funny old day here on the rock in the Irish Sea.
Earlier in the week we'd been invited to see a show this afternoon, at the theatre in Douglas.  'Miss Saigon' has been on for the last few weeks, and Stephen and I had said we should go and see it but, we'd never actually got around to booking it. When a friend's husband rang me earlier in the week and asked if Stephen and I would like to go along with his wife Catherine, I jumped at the chance, especially as it's the show's last weekend.
We met up with Catherine early and had a lovely lunch, then it was off to the theatre. It's years since I've been to a show - Phantom was the last one I saw.  Anyway, Miss Saigon was fantastic!!  I thoroughly enjoyed it - Stephen enjoyed it too as it started off with lots of girls in underwear/bikinis!!  I would recommend it as one to watch.  It brought a tear to my eye at the end, but I won't say anymore, don't want to give the plot away.


The drive home from Douglas was a little strange.  When we went into the theatre it was a lovely sunny afternoon, same when we came out.  Stephen decided to take the coast road home, it's quieter traffic wise, and more picturesque.  As we were leaving the prom when you looked out to sea it was just like a wall of cloud/rain was moving towards you across the sea.  We stopped the car and got out to look - I wish I had had my camera with me because it was weird.  I looked behind me and suddenly realised that the cloud was closing in over the hills too, coming at us from both sides. Before we knew it we were in the middle of a snow storm!!  It was freezing.......
Now we live at the top of a hill, so we though it best to get on home.  We drove very slowly, through a blizzard.  It was just like a Christmas card picture. Thankfully, Laxey didn't have that much snow.   Now this is typical Isle of Man weather, changeable very quickly. Although we don't usually get snow.  I've been feeling a little left out whilest the UK has had the cold snap.  I suppose I should be careful what I wish for!  Who knows what we'll get tomorrow.
from the bedroom window

Brrrr........... nice and warm inside though!

more clouds coming over the mountains
Hope the weather is being kind where you are.

Bye for now
Linda
x

Thursday 16 February 2012

Key to my Heart - Tag #1

Thanks for popping by.  Just to let you know, I am a BIG Tim Holtz fan.  For those of you that follow Tim you'll already know about his '12 Tags' projects.  For the past 5 years he has done a series called  '12 Tags of Christmas', however this year is different.  The Christmas theme has been retired (Nooooo!) and he has replaced it with  '12 Tags of 2012' (Yeah!!)   Each month, starting with February, he will create a new themed Tag and post the tutorial, (with pictures and step by step instructions) onto his blog http://www.timholtz.typepad.com/ .  There's also a place on there where, each month, fans can show how they've used Tim's inspiration and created their own versions of his tag.  There's already some fab projects on there - people have been very busy.
There's no more waiting until the end of the year, now we get a new idea at the beginning of every month.  Exciting!!  I've only ever looked at his tag creations before,  but, this time I'm going to join in with the fun each month, and create my own version - you know how I love my tags!

Here's what I came up with for the February one.....

February 2012

List of products I used...
Cream cardstock - to make the tag
Various Distress Inks  - shades of reds/pink
Tim Holtz cling stamp - from 'Stuff to Say'
Script rubber stamp
Tissue Tape
Grunge board - for the heart
Winged Heart Sizzix Die
Red Glimmer paper
Tim Holtz Vintage ribbon
Various Idea-ology pieces
Adage Tickets
Lace from my stash

Really enjoyed making this.  Looking forward to next month already.  Let me know if you're joining in too.

Thanks for looking.
Linda
x

Wednesday 15 February 2012

Princess for a Day!

Hi everyone,
Well, that's Valentine's Day over with again.  My card must have got lost in the post - like it does every year. Hope you all got yours.  Stephen always says he shouldn't have to send me a card to show that he loves me - hmm......
I shouldn't complain though,  he did bring me a large chocolate heart when he came home from work (sweet!), and he took me out for a lovely meal, so at least I didn't have to cook. (The diet starts today by the way, at least for the next 3 weeks, until my birthday).

I sent him a card though - I always do . I must admit  it was quite a simple one this year.  As you can see, not a lot on it.  I did use my SU Glimmer Paper though, you won't believe how hard it was for me to cut into that!! It's one of those that you just want to look at and stroke occasionally - it's gorgeous!  So sparkly, and it doesn't shed.

 
Less is more!

I did have a nice day though yesterday, I spent the whole day in my craft room. I was making a special card for my daughter to send to a friend's little girl.  She rang me the other day and asked if I would do a card for Abbi.  I'd already decorated letters for her for Christmas, so I knew that she really loved the Disney Princesses, and of course it had to be pink and sparkly. So, I thought it was the perfect opportunity to spend some time with my Cricut machine - yeah!  This is what I came up with...

very pink and girly
had to have a crown


Fit for a princess


I got a little carried away I think, but it was fun.  Here's a list of what I used...

Cricut Cartridges -  Disney Dreams Come True (for the castle)
                              Disney Happily Ever After (for the crown)
                              Storybook Font (for the lettering on the front)
                              Disney Pooh Font (for the '4 today')

The bunting was made with the Stampin Up! Pennant Punch. I used the Cuttlebug Alphabet 'Olivia' for the word 'Princess' and I sneaked in a couple of Nestabilities too. The scrapbooking papers were from the 'Lost and Found' range by My Minds Eye.  It all took a while to put together, as I inked the edges of everything and did a bit of faux stitching here and there, but I was pleased with the end result.  I think that Abbi will like it - I hope so anyway. 

Abbi's name given the 'Princess' touch
Thanks for popping by.  I'm going to make a start on a tag this afternoon, inspired by Tim Holtz himself, for his '12 Tags 0f 2012'  http://www.timholtz.typepad.com/  Once it's finished, I'll post it on here.  Let me know what you think.

Bye for now
Linda
x

Sunday 12 February 2012

Tagged!!

Hi everyone,

Hope you're enjoying your weekend.  As promised, although a day late, here's my latest Tag. There's a matching card too, so all I need now is someone special with a birthday!


I've used the Stampin Up! Spice Cake papers again, and one of my favourite SU stamp sets 'Vintage Vogue'. This is a beautiful set of stamps that can be used for so many occasions, well worth purchasing.

 The good thing about decorating Tags is that you can make use of all those little bits of paper and card that are left over from previous projects. So don't throw anything away!  I've used lots of cut off pieces of Very Vanilla cardstock to stamp the flowers on and also the background panels.  I used Versafine Vintage Sepia and SU More Mustard inks. I don't normally go for mustard colours but I ordered this one as it co-ordinates with the Designer Papers and I love it.


 The back of the Tag was decorated too, with a space left to put a message.


My addiction for tags started last Christmas.  These are a few that went onto gifts for family and friends.  Hope you like them.

No doubt you're thinking I have too much time on my hands - you're probably right, but I really loved making these, more than doing my Christmas cards I think.  Each one was different, some only slightly, but they were different. I used a variety of Christmas stamps, a lot of Tim Holtz distress inks, the Reindeer Alterations die, the new Poinsettia die from Nestabilities, lots of ribbon, gems and of course glitter.  They were so much fun to do, and it was all worth it as everyone loved them.


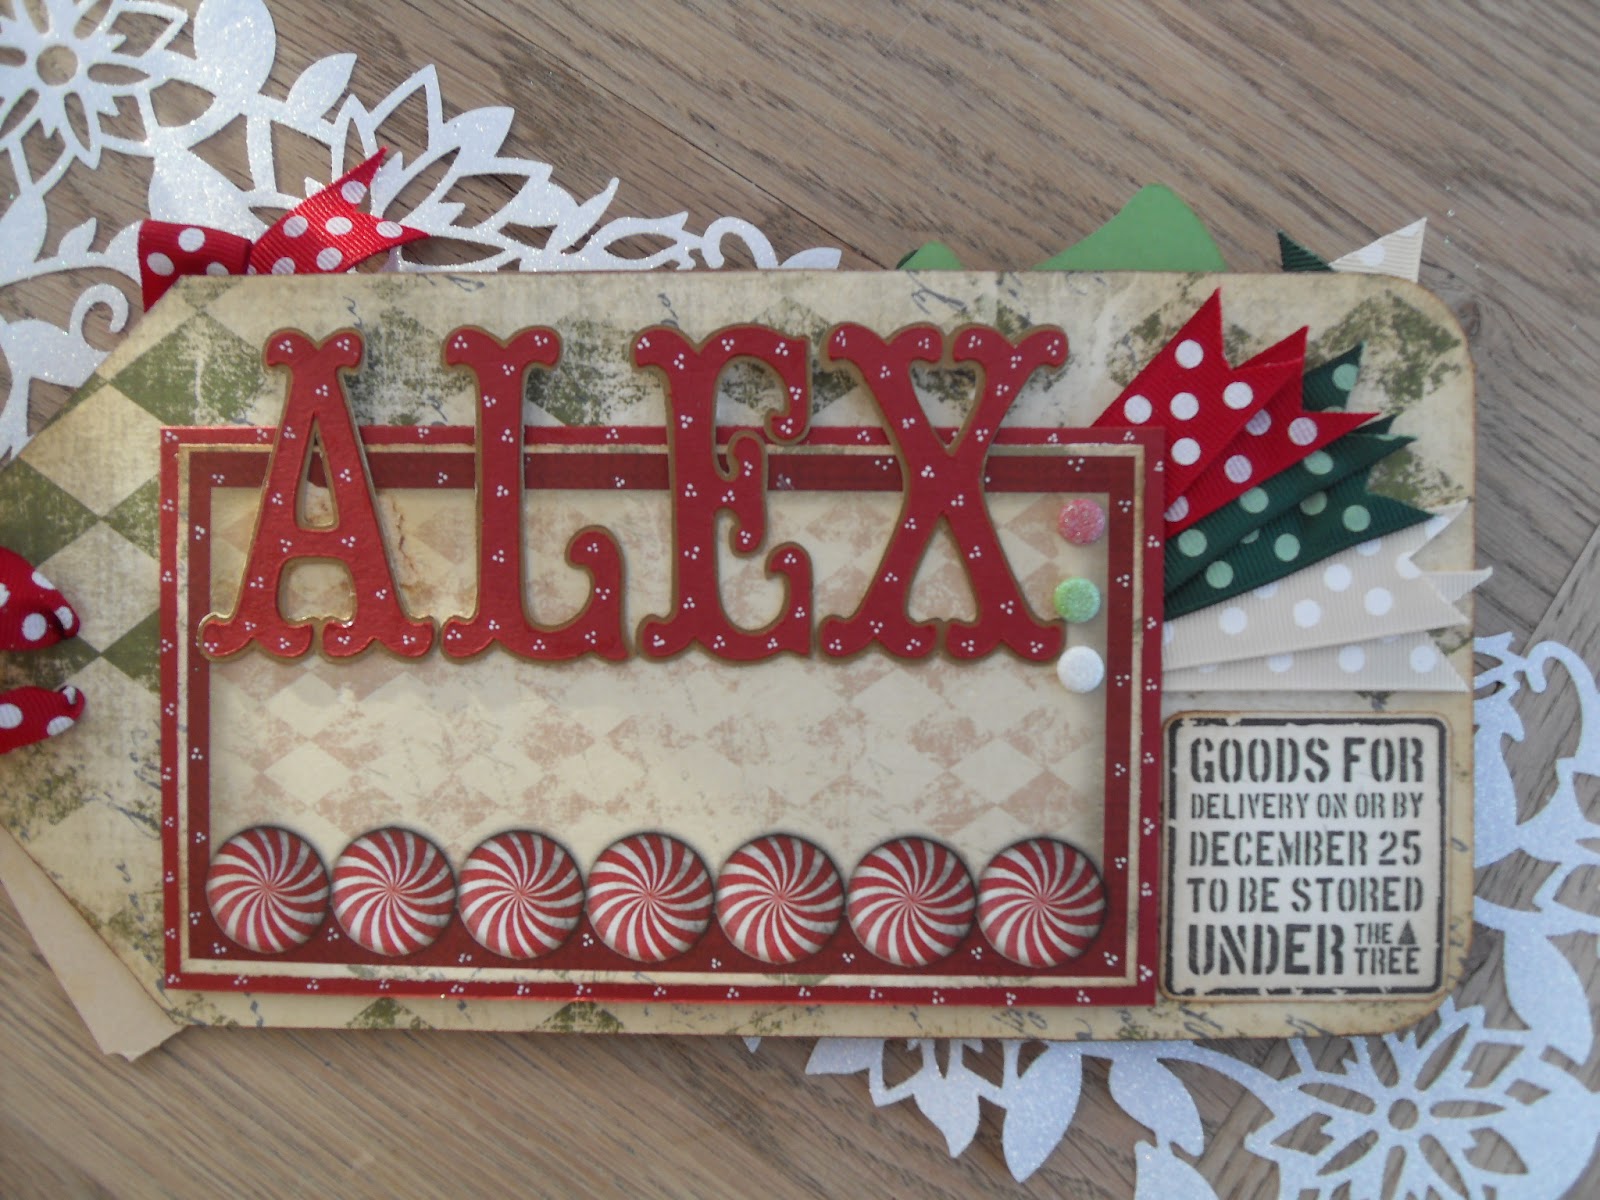
I decorated all the backs with scrapbooking papers. The names were all die cut and I left space  to write a personal message.


 This was for Alex, my Grandson.  The stamp is from Magnolia, coloured with Copic pens.  The name on the back was cut on the Cricut machine using the 'Storybook' cartridge.


It's weird showing Christmas stuff in February, but hey, they're tags.

Well it's off to tidy up my desk now, to make way for the next project.  My daughter's asked me to make her a card.  It's her friends little girl's birthday in March and she wants something special for her, something Princess themed.  I feel a Cricut day coming on - ooh fun!!  I'll let you see what I come up with.

Bye for now
Linda
x
     

Friday 10 February 2012

You can have your cake and eat it too!!

Well, it didn't take me long to mess it all up again!!  Work desk is back to it's usual state - covered in stuff!  Not quite as bad as last time though, but I've had fun.

I've been playing with the new 'Stampin Up!' Designer Papers range called 'Spice Cake', available in the Spring Mini catalogue, and they are gorgeous.  I love the colour combination. I don't usually go for paisley prints but I couldn't resist these. They arrived on my door step, along with a few other bits and bobs, sent with the usual loving care from my very good friend, and Independent 'Stampin Up!' Demonstrator, Sally-Jo. http://stampin-sally.blogspot.com/  


This is what I came up with.  There's very little rubber stamping on these cards, I focused on just using the papers, then added ribbons and a couple of the fabulous SU antique brads. (Note to self....  must get some more!)


This next one is my favourite I think.  It's my take on a card that's in the new SU Idea Book & Catalogue (page 8) I used the 'Happiest Birthday Wishes' stamp set, available from the 'Hostess' section, as it's been used in the catalogue. I stamped with Vintage Sepia ink (not SU) on to Very Vanilla cardstock. Mat and layered with brown pearlescent card (not SU) and the Spice Cake paper.  I made a pinwheel using squares of the Designer Papers, (really simple to do - 2 x 2.5inch squares off set for the base, and 8 x 1.25inch squares to make the pinwheeel design) and then turned it into a flower by adding a strip of green cardstock for the stem and a couple of leaves made from the wing of the SU 'Bird Builder' punch  It's quite a simple card to make but very effective, I think so anyway.

I want to do a tag tomorrow, if I get the time, using the same papers.  I have this thing at the moment for making oversized gift tags.  It started last Christmas, (Tim Holtz's fault), everyone got one.   Because people were only getting small gifts (because I had to post most things over to the UK) I made up for it with a large tag!  The comments I got in the New Year were fab, everyone loved them.  I'll see if I can dig some samples up and post them, along with one that has been SU'd!!

I've had a really nice SU afternoon today.  Hope your day was good. Thanks for stopping by.

See you again soon.
Linda
x

Thursday 9 February 2012

Fresh start

Morning all,
Well, after two days cardmaking there was no space left on my craft desk, or the floor!   I'm not a tidy crafter, but I always like to start with a clear desk. During the course of the day my workspace shrinks  By the time I've finished, I usually find that I am working in a space that is about 6 inches square, if I'm lucky, and everything is piled up around me filling all available space. A bit like this......


You can't actually see to the sides but, on the left there are boxes on boxes of card, papers, stamps, nesties etc., etc.  and on the right there's my inks, more stamps, ribbon boxes, need I go on. 
Well, yesterday afternoon I decided to have a tidy up.  Everything was put away where it should be, and the desk was cleaned.  I then decided it was time for a change around (I do this every now and then).  So I moved my desks. 
Everything is now tidy again, all ready for the next project.  Look, loads of space to work in, and fabulous  new Stampin Up products waiting to be used.  Guess where you'll find me today........

Thanks for looking
Enjoy your day
Linda
x

Tuesday 7 February 2012

It's all Black and White

Brrrr!  We had a frosty start over here this morning, so I decided to snuggle in my craft room and carry on where I left off yesterday.
Same Clarity stamp but this time I went for the old black and white look, only I always like to add a dash of colour.  This is an old favourite style of mine and finds it's way into most of the stuff I do.  Hope you like it.


Here's a couple more examples of my black and white designs, the first one being Christmas cards I did last year.  Nice and simple stamped onto acetate, glitter added to the back and then mat onto white card to make it pop that bit more, a little dash of red for the festive season - classic!  Sorry for the quality of the pictures, I'm no photographer.  I'll have to try and get it so that the glitter and the finer details are easier to see.  Maybe a new camera is needed - hmm?

Penny Black rubber stamps

This was a card I sent off to one of the Craft magazines as a competition entry, I didn't win anything, but I believe it's been shown in one of the issues.  Again, quick and easy.  Just a little shading with distress ink to add the colour, and of course some sparkle added.

I love this Lavinia Cat Stamp - he minds me of my cat Spot!


Thanks for popping by
Linda
x

Monday 6 February 2012

4 weeks and counting!!!

Hello there,
It's been a lovely day here on the Isle of Man, the sun has been shining all day, and I actually spotted some snowdrops out in the garden.
I've had quite a nice day today. Started off with a lovely lie in, after watching the SuperBowl last night (Stephen didn't have to be in work until lunchtime). Then spoke to Lauren.  We chat most days, it's always nice to hear from her and find out what Alex is up to. Apparently he can open the front door now, she's going to need eyes in the back of her head.  Later this afternoon I had a lovely telephone chat with my friend Sue.  She was telling me she's started on a diet and  fitness programme, sounds like hard work to me.  I hope it goes well for her.

If you're wondering what the 4 weeks and counting is all about well, it's a very BIG birthday that's hurtling it's way towards me at high speed!  Not looking forward to that at all.  The last big birthday was bad enough, but this one well.....  enough said for now.
Speaking of birthdays, it was Deborah's today.  Happy Birthday Deborah! It sounds as though she had a nice day from what I've read on Facebook.

I've been playing with my stamps again today.  This time it was Clarity.  I must have had these particular stamps for a couple of years at least and I've never used them.  The lovely Maria Simms posted a card on her Blog a few days ago and gave me the inspiration to do something with them.  Check out Maria's Blog,  http://inkymits.blogspot.com  there's some fabulous desgins on there, she's one very talented lady. She is also the NorthWest's demonstrator for Clarity Stamps, look out for details of the classes she does.

Anyway, here's what I came up with.  The background stamp was one I had in my stash (not a Clarity stamp) but I think it goes well with the corset.  It was all stamped using Coffee Archival ink and then distressed and coloured with Worn Lipstick Distress Ink.  I decided to decoupage the corset and add the lace and thread.  I think it looks pretty and very 'feminine'.


I like to decorate the inside of my cards to match, I think it's a nice touch.  Hope you like it.

Thanks for looking
Linda
x

Saturday 4 February 2012

Happy Weekend!!

Morning everyone,

Hope  it's a little nicer where you are this morning.  The weather here is awful - rain, mist, wind and it's cold.  Should have stayed in bed I think.

As promised here are a couple of pictures from yesterday.  I'll apologise now for the quality of them, the light was not good, plus I'm rubbish at taking photos.

I wanted to keep this one simple.  She's so beautiful, I just stamped her in black onto white card and embossed with clear embossing powder.  I inked around a die cut circle to give the effect of a moon behind her (the moon is slightly glittered but this hasn't shown on the photo - I told you I was rubbish!!).  I added a little lace, ribbon and a few pearls.

Ella Bella

Aloysius was another easy one to make.  I used the same colour ink for both cards, but just by changing the background papers and embellishments you can completely change the look of the card.  The one on the left is quite feminie, I think , while the one on the right could be sent to a guy.  I love this little bear, his face just reminds me of the teddy I had when I was a child......... That's a LONG time ago :)

Aloysius - isn't he sweet...

The final one took a little longer to make. Again, the picture is not brilliant, but you can get the idea.  I used the script stamp to make the background, stamped randomly onto white card with Versamark ink then clear embossing powder over the top.  Two colours of Distress Stains, Bundled Sage and Victorian Velevet where then swiped over the top, again quite randomly to give a nice blended effect.  Polish off the ink from the script with a paper towel to make it really pop.
Next I stamped the Anenome corner with Black Archival ink onto white card and cut around it. I used the same colours only this time I used the Distress Ink Pads and blended the two together using a blending tool.  You get a much paler effect with the pads however if you want more colour just keep building it up with the blending tool, you're in control.  I stamped the flowers again, coloured them a little darker and decoupaged them to add a little dimension.  This was then attached to the card to form a pocket for the tag to sit in.

The tag was done in pretty much the same way using the ink pads to colour.  I added a sentiment, the butterfly and a piece of pretty vintage seam binding. Done!

 large Anenome corner and the Script background


I've really enjoyed the last couple of days just playing with stamps and inks and seeing what I come up with, no pressure to actually produce something.  I have a few more things I want to do, stamps that I've had for ages and not used, along with inspiration from magazine articles and other blog posts I've seen.  Looks like next week is spoken for, can't wait.  See you then.

Thanks for looking

Linda
x

Friday 3 February 2012

Where has this week gone!!

Hi  there,
I can't believe it's the weekend, again!  Times flies when you're having fun.

It's been a reasonably quiet week this week, not much to blog about really.  Tuesday I met up with a friend, Catherine, we had coffee and a good old chat.  We hadn't seen each other since Christmas so it was great to catch up. Lots of crafty chat too which was nice.
I've been able to spend a few days in my craft room too.  My parcel arrived from the UK - shopping I did while I was over there last week!  I just had to spend some time filling up my new Tim Holtz Cargo and Trinket Cases.  These had been on my Christmas list but somehow Santa forgot to get them.  So, I bought them myself!! All my Distress inks and stains are in the big one and the small one is full of Idea-ology pieces.   It all looks sooo cool. Stephen wasn't quite as excited as me when he came home from work and dinner wasn't ready..... (Oops!)


Cargo Case filled with fabulous Distress inks
The Trinket box filled with Idea-ology goodies
 
I also started playing with some of the goodies I got in my prize for becoming Craft Stamper of the Year.  There's absolutley loads of stuff, it was hard deciding what to start with.  In the end I went for my Indigo Blu stamps. (You can see the pile of them in my Cargo Case)  Indigo Blu are a relatively new company in the craft world.  British too which is nice. Their products are always featured in craft magazines and they recently premiered on Create and Craft.   Their stamps are fabulous, right up my street.  They remind me a little of Tim Holtz style of stamps but with that English edge, and I had virtually the full range to choose from. It's a tough life!! Why not take a look at their website and see what you think http://www.indigoblu.com/

I'll be back tomorrow with some pictures of the end results.

Thanks for popping by
See you tomorrow
Linda
x